Developer and automation
A REST API, webhooks and e-signing for the systems around your loan book
Use the API to read and write borrowers, loans and repayments from your own software, webhooks to hear about changes as they happen, and the built-in e-signing to get loan documents signed without a separate signature service.
curl "https://api.lendbox.io/borrowers?page=1&limit=20" \
-H "Authorization: Bearer live_your_api_key"- Status
- Built in
- Plans
- API on Business, Growth and Enterprise
- Environments
- Sandbox and production
- Documentation
- api.lendbox.io/docs
Quick start
Four steps from nothing to your first response.
- 1Generate a keyIn the dashboard, open API Integration → REST API and select Generate New API Key. Store it somewhere safe. Generating a new key stops the old one working, so rotate it whenever someone with access leaves.
- 2Choose the environmentSandbox and production are separate environments, each with its own base URL, keys and data: https://sandbox-api.lendbox.io and https://api.lendbox.io. Sandbox keys start with sandbox_ and production keys with live_. Build against sandbox first.
- 3Send the key on every requestPass it as a bearer token in the Authorization header. The response codes the API returns are listed on the same dashboard page.
- 4Work from the referenceEvery endpoint, parameter and response shape is in the public documentation at api.lendbox.io/docs. The borrowers list, for example, pages with page and limit parameters.
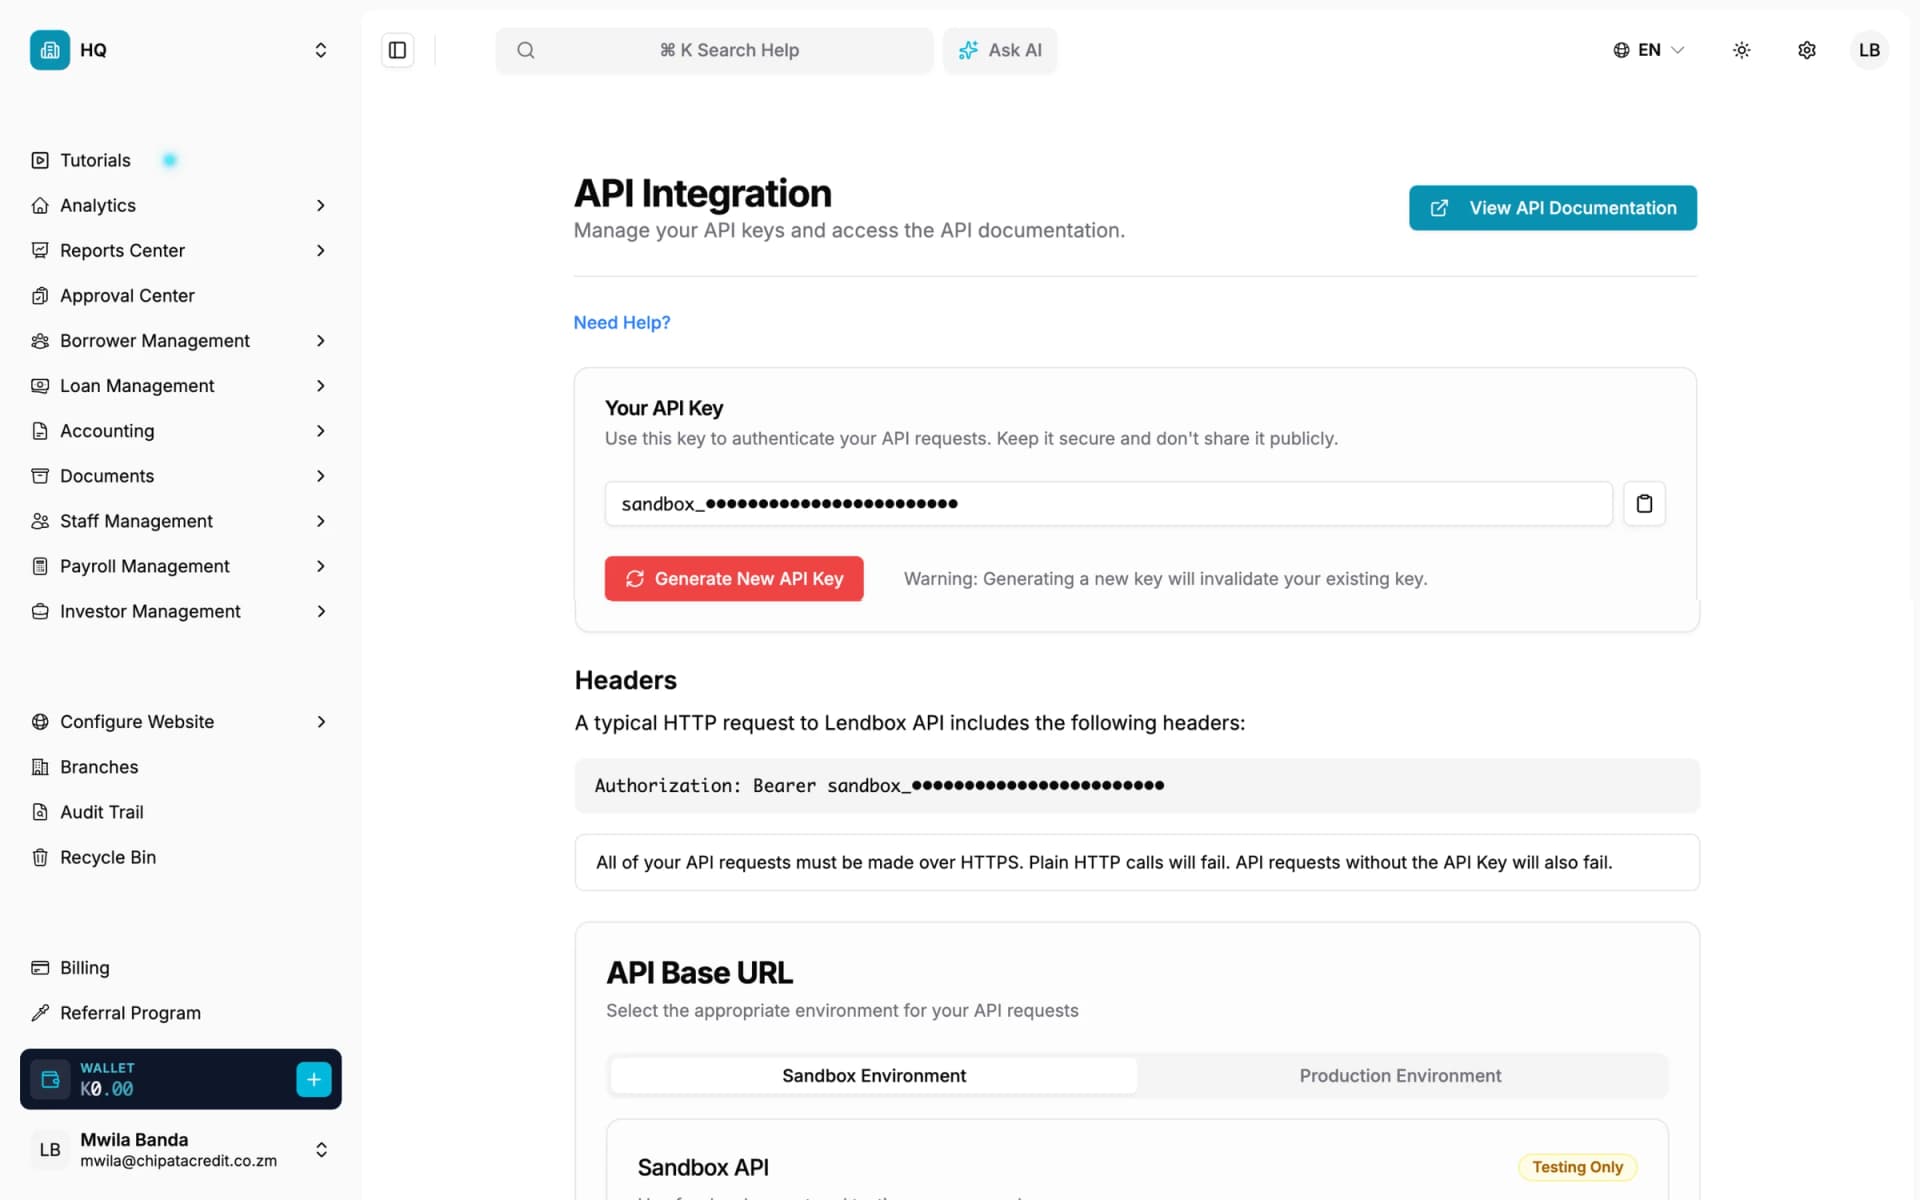
One key per workspace, shown with the header to send it in and both base URLs.
What teams build on it
Most integrations fall into one of four patterns. Each uses endpoints that are in the public reference today.
Onboard from your own app
Create borrowers and loans from your own website or onboarding app with POST requests, so an application taken outside Lendbox never has to be typed in twice.
Post repayments from another channel
When money arrives somewhere Lendbox does not connect to, such as a bank account or a payroll run, post the repayment to its loan with one call from the system that saw it.
Feed your own reporting
Read borrowers, loans and repayments on a schedule into a data warehouse or a BI tool, and use webhooks to know which records changed in between.
Start your own workflows
Use the repayment created event to send a thank-you from your CRM, or the loan created event to open a file in your document system.
How API keys work
- One key per workspace. It acts with the access of the workspace owner, so treat it like the owner’s password and keep it on your server, never in a browser or an app.
- Keys do not expire on their own. Regenerate the key from the dashboard to revoke it.
- Seeing and managing the API page is its own staff permission, so you can limit it to the people who build integrations.
- API access is included on the Business, Growth and Enterprise plans.
Webhooks: hear about changes as they happen
Add a webhook under API Integration → Webhooks: enter the URL of an endpoint you control and tick the events it should receive. Lendbox sends a JSON POST to that URL each time one of them happens.
| Record | Created | Updated | Deleted |
|---|---|---|---|
| Loan | Yes | Yes | Yes |
| Borrower | Yes | Yes | Yes |
| Repayment | Yes | Yes | Yes |
| Investor | Yes | Yes | Yes |
| Investor product | Yes | Yes | Yes |
| Investor account | Yes | Yes | Yes |
POST /your/webhook/endpoint
Content-Type: application/json
X-LendBox-Event: <event name>
X-LendBox-Webhook-ID: <your webhook's id>- X-LendBox-Event
- Which event fired, so one endpoint can handle several.
- X-LendBox-Webhook-ID
- Which of your webhooks sent the delivery.
Building a receiver that holds up
Reply fast
Lendbox waits ten seconds for your endpoint to answer. Acknowledge the delivery first and do the slow work afterwards.
Treat a delivery as a signal
Before acting on an event, fetch the loan, borrower or repayment it names from the API. You get the current record, and you confirm the event is genuine.
Reconcile on a schedule
Each event is delivered once. A nightly read through the API catches anything your endpoint missed while it was down, and idempotent handlers make a repeat harmless.
E-signing for loan documents, built in
Loan agreements, statements and repayment schedules are signed inside Lendbox, so the signed copy lives on the loan rather than in another service’s account.
1Build the template
Under Documents → Loan Templates, write the agreement in the editor with placeholders for the borrower and loan details, or upload a Word document with the placeholders already in it.
2Mark where people sign
On your own templates, place the signature and text fields once, and every loan using that template gets the same signing areas. The built-in Loan Statement and Repayment Schedule arrive with their signature blocks in place.
3Send the links
From the loan’s Documents tab, choose Send for Signature. Sign as yourself, email the borrower their link, add the loan officer, and add other signatories such as a next of kin.
4Collect the signatures
Each signer draws their signature on screen and saves. Every signature produces a new version of the PDF, so countersigning works and the earlier versions stay on the loan.
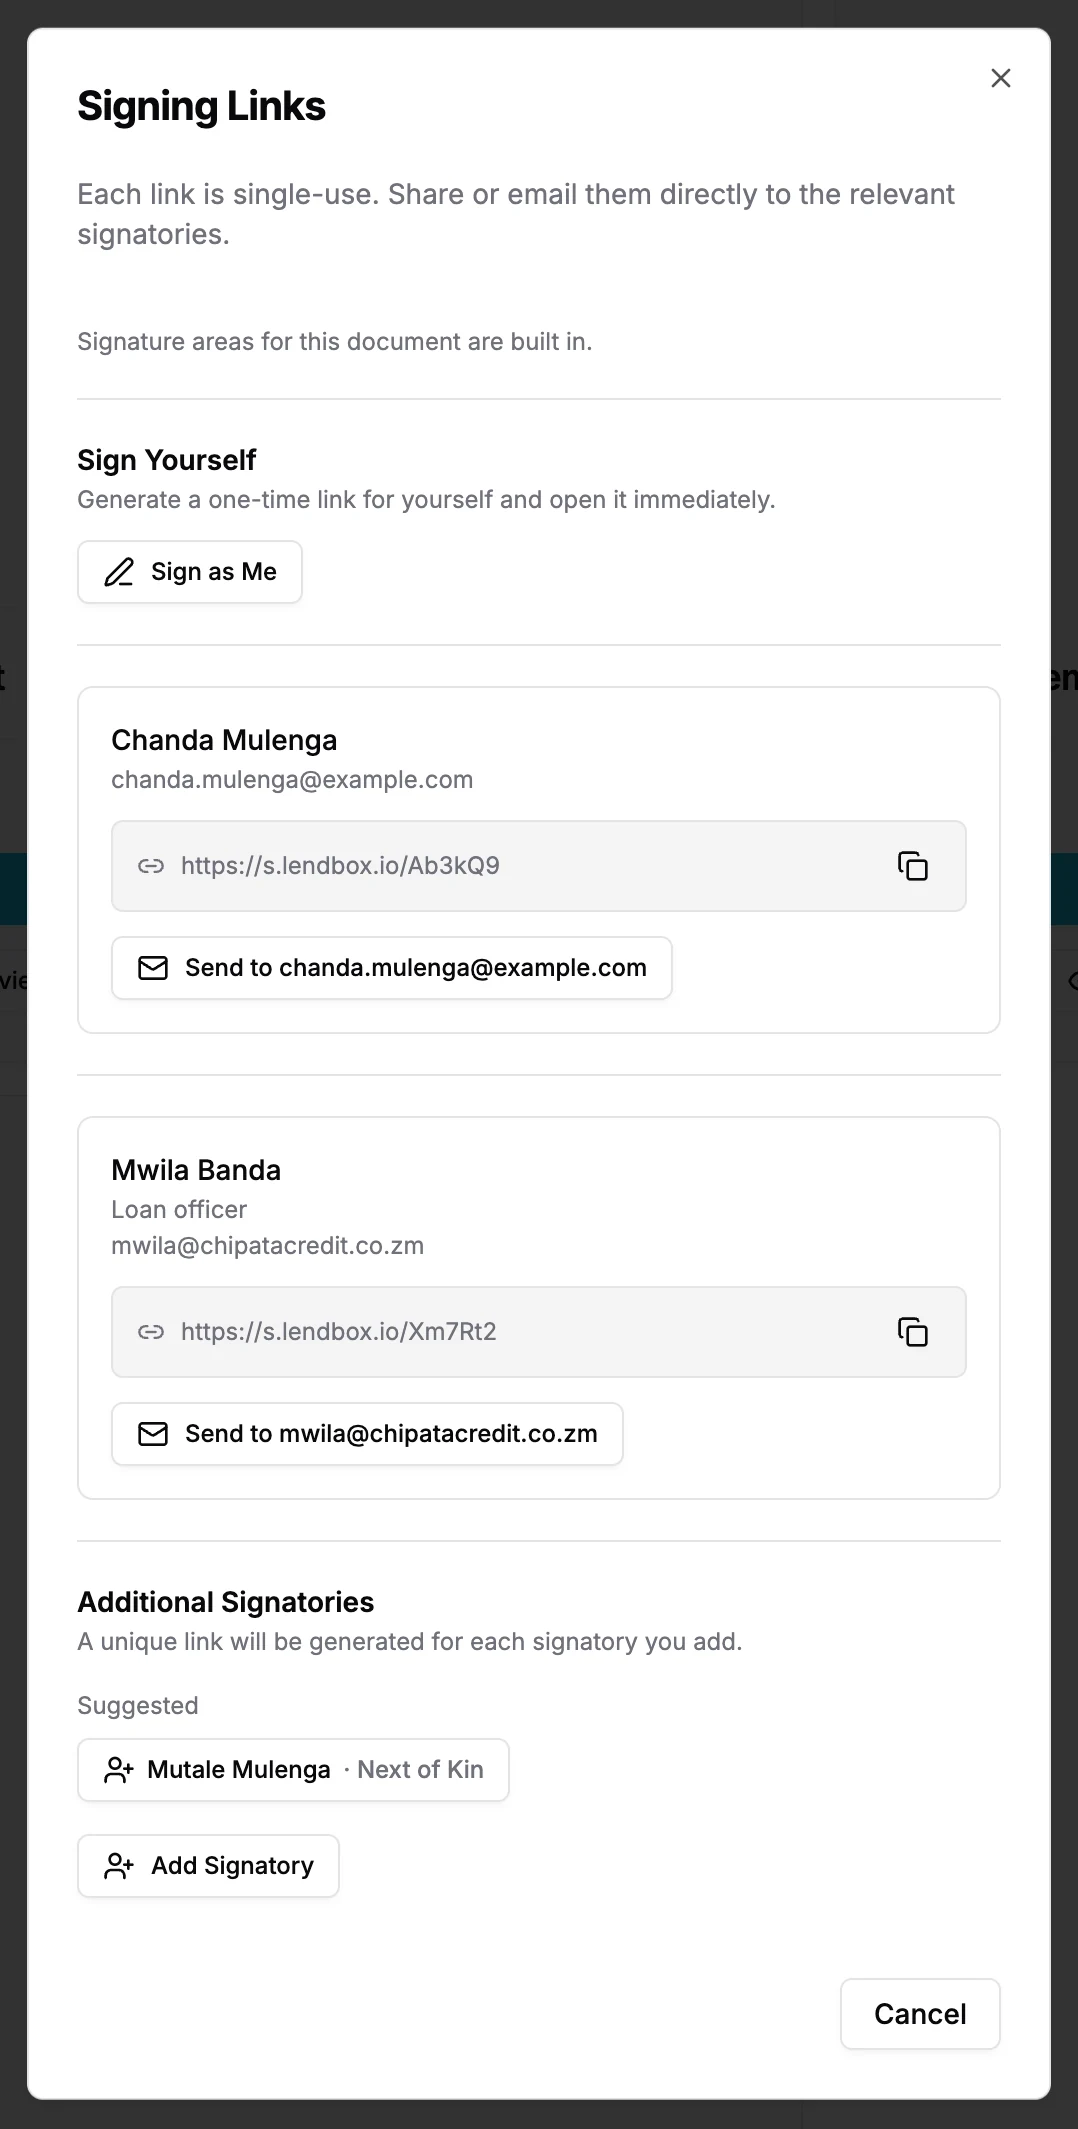
Signing links go to the borrower, the loan officer and anyone else you add.
Each signing link works once and expires after seven days.
What the signing record holds
Recorded
- The signer’s name and role: borrower, loan officer or other
- When they signed
- Every version of the document, before and after each signature
Not recorded
- A one-time code: none is sent, so possession of the emailed link is what identifies the signer
- The signer’s IP address or device
- A separate completion certificate
Staff can save their own signature under Settings → Admin → My signature, then fill every field assigned to them in one click.
Frequently asked questions
- Yes. It is a REST API with public documentation at api.lendbox.io/docs, separate sandbox and production environments, and bearer-token authentication with a key you generate in the dashboard.
- Business, Growth and Enterprise. E-signing is included on every plan.
- Yes. Subscribe to the repayment created event. Lendbox posts to your endpoint when the repayment is created, and you can then fetch it from the API for the full record.
- That depends on the law where you lend and on the document, so check with your legal adviser. Lendbox records who signed, in what role and when, and keeps every version of the signed PDF on the loan.
- Yes. The signing link opens in the phone’s browser and the borrower draws their signature with a finger. There is nothing to install.
- You can build it. The API reads borrowers, loans and repayments and webhooks announce changes, so a developer can push them into another system. There is no ready-made connector for QuickBooks or Xero.
Does Lendbox have a public API?
Which plans include API access?
Can a webhook tell me when a repayment is posted?
Are Lendbox e-signatures legally binding?
Can borrowers sign on their phone?
Can I connect Lendbox to accounting software through the API?
Keep reading
- All integrationsLendbox integrationsMobile money in Zambia, SMS and WhatsApp reminders, Excel import, the REST API and webhooks, each marked with how it connects.
- RelatedSecurity and controlsPermissions per module and role, maker-checker and the audit trail.
- RelatedSecurity overviewEncryption, hosting, backups and how to report a vulnerability.
- RelatedBorrower repayment channelsWhere signing links sit among the portal, payment links and statements.
- RelatedIntegrated accountingThe general ledger every loan, repayment and fee posts to.
- RelatedData migrationBringing borrowers and loans in by Excel rather than through the API.
Build on Lendbox
Start a free trial, read the API reference, and connect production when you are ready.
No card required