Borrower channels
Every channel a borrower uses to apply, sign and repay
A borrower meets your institution in more than one place: a form on your website, a link in a text message, a statement in their inbox. In Lendbox each of those opens onto the same loan record, so whatever a borrower does through one channel shows up in all the others, and on your side of the dashboard.
- Borrower portal
- Application form
- Payment link
- Mobile money prompt
- Loan statement
- Signing link
- Reminders
- Status
- Built in
- Available in
- All countries; online payment in Zambia
- Set up by
- You, from Configure Website
- Plans
- Own domain on Business, Growth and Enterprise
The channels at a glance
Seven channels, what each lets a borrower do, and what it takes to switch on. None of them asks the borrower to install anything.
| Channel | What the borrower does | Sign-in needed | Where it works | Set up by |
|---|---|---|---|---|
| Borrower portal | Sees each loan’s balance, schedule and upcoming payments, downloads statements and updates their profile | Yes, to see loans | All countries | You, in Configure Website |
| Application form | Chooses an amount, a term, a branch and a product, previews the repayment schedule and sends the request | Only if you require accounts | All countries | You, by choosing products and branches |
| Payment link | Opens a page with the loan and its schedule and pays by mobile money | No | Zambia | Automatic, one per loan |
| Mobile money prompt | Approves a payment request on their phone with their PIN | No | Zambia | Your officer, from the loan |
| Loan statement | Reads their balance, schedule and repayments, with your banking details | No, if you send it | All countries | Automatic; banking details in Settings → Statements |
| Signing link | Reads a loan document and signs it on screen | No | All countries | Your officer, from the loan’s Documents tab |
| Reminders and receipts | Gets due-date reminders and payment confirmations by SMS, WhatsApp or email | No | All countries, SMS varies | You, in Settings → Notifications |
One loan, channel by channel
This is how the channels hand a borrower from one to the next over the life of a single loan.
Apply
Chanda finds your site on her phone, enters how much she needs and for how many months, picks the branch nearest her and sees the repayment schedule before she commits. She creates an account, fills in the fields you asked for and uploads her ID and a payslip.
Answer a follow-up
Your officer needs her employer’s address. Instead of phoning, he asks for more information from her borrower record, and her portal shows a request to complete her profile the next time she signs in.
Sign
The loan is approved. The officer sends the loan agreement for signature and Chanda gets a link by email. She draws her signature on her phone, and the signed version is stored on the loan alongside the unsigned one.
Get reminded
Two days before her first instalment she gets an SMS in your wording, and another on the morning it falls due.
Pay
She opens the payment link her officer sent, approves the mobile money prompt, and the repayment is on her loan before she puts the phone down. Outside Zambia she pays the way you already collect, and your team records it.
Check
At month-end she downloads her statement from the portal and sees the repayment, the new balance and what is left on the schedule.
Chanda is an illustration, not a customer.
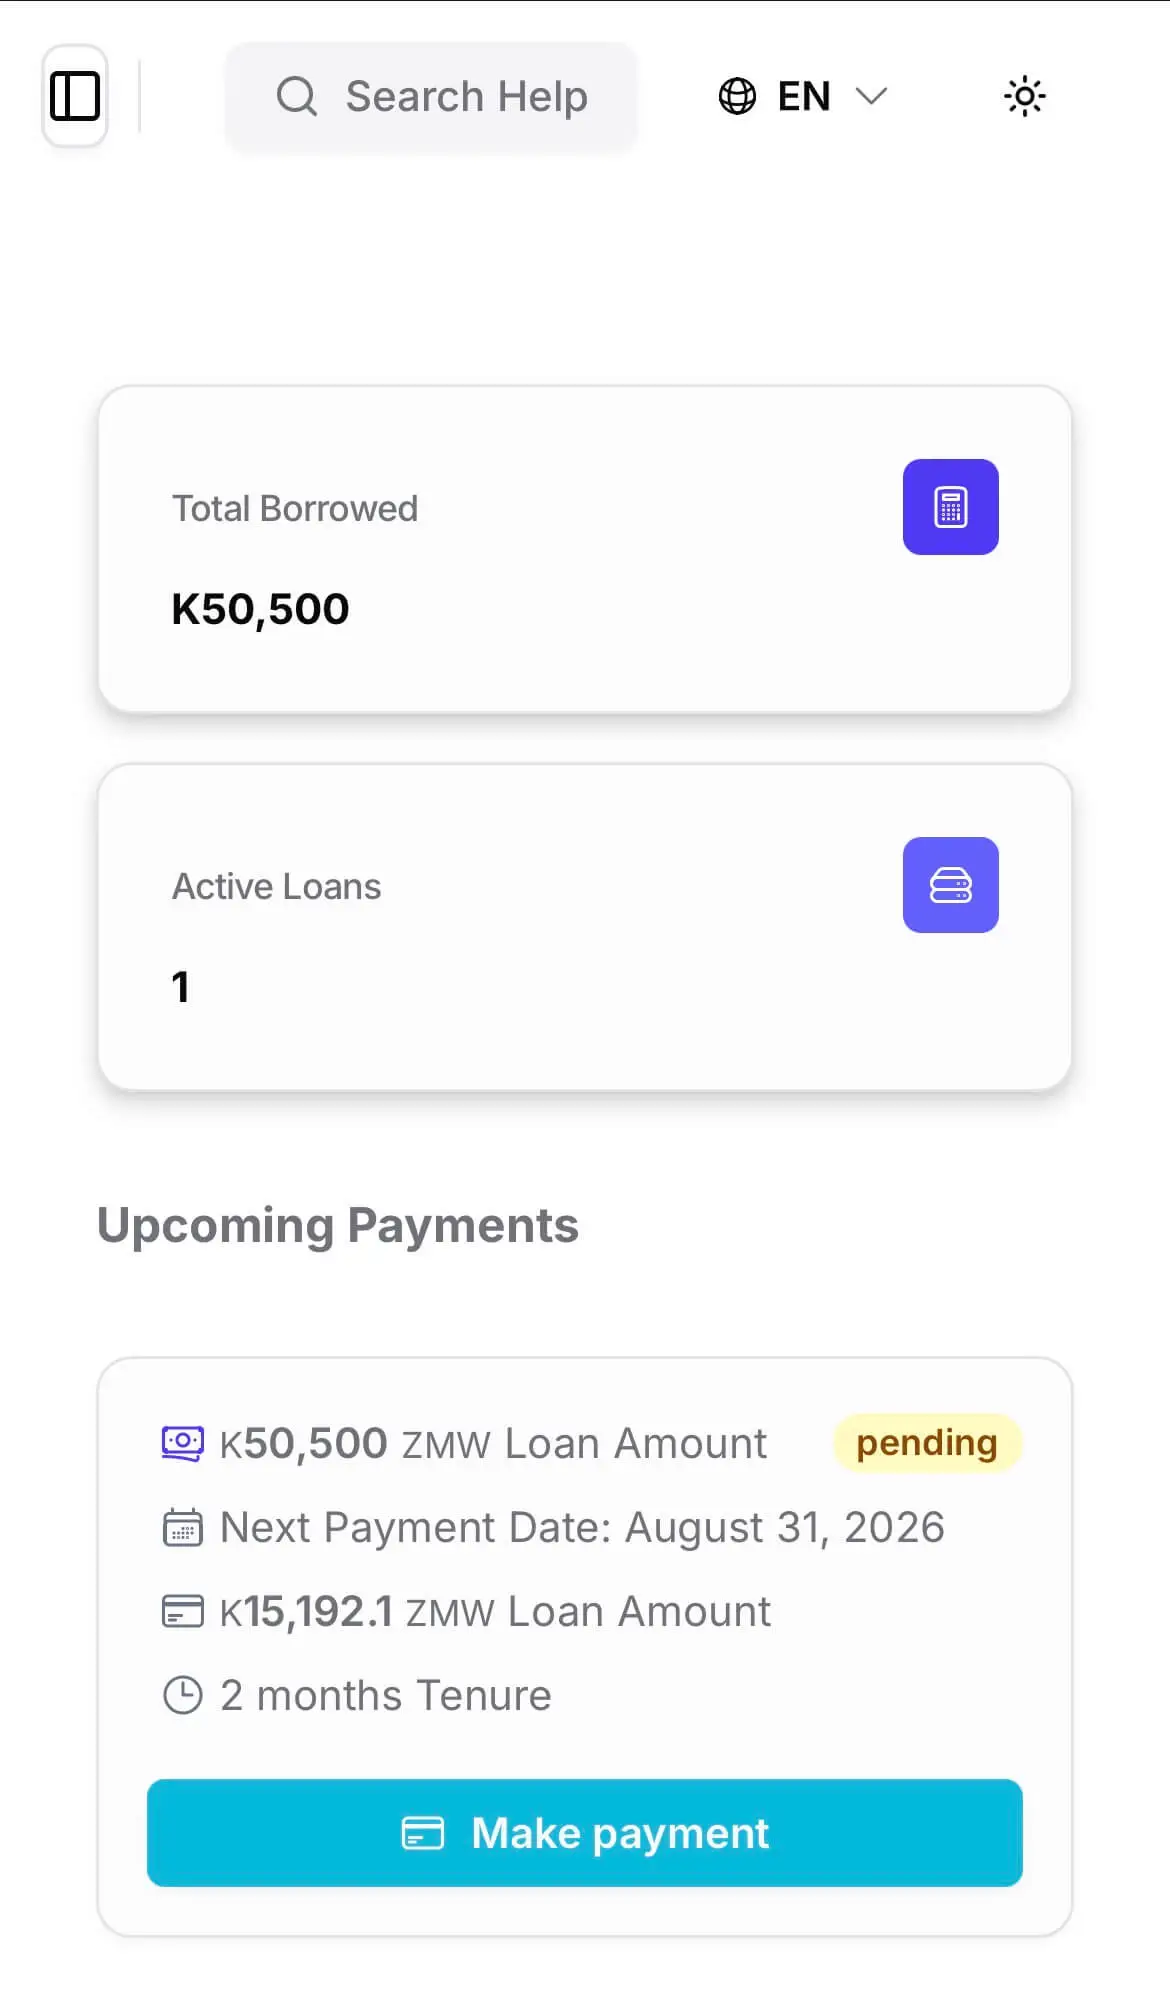
What a signed-in borrower sees: what they owe, when it is due, and a payment button in Zambia.
Put the portal on your own domain
Every portal starts on a Lendbox subdomain such as yourname.lendbox.io, which works the moment you save it. To run it on your own domain instead, you need access to that domain’s DNS settings. Custom domains are included on the Business, Growth and Enterprise plans.
- 1Open Configure WebsiteIn the dashboard sidebar, open Configure Website, then Configuration. You need the website settings permission to change it.
- 2Choose Use Your Own DomainEnter the root domain without www, for example yourlender.co.zm. The portal runs on the root domain, and www is pointed at it.
- 3Add the two DNS recordsSelect Verify Domain. Lendbox shows an A record for the root domain and a CNAME record for www. Add both at your domain registrar or DNS host.
- 4Wait for the certificateOnce the records resolve, Lendbox issues the SSL certificate for your domain itself. The card shows Generating until it is ready, then SSL Certificate Active.
- 5Open the siteLoad your domain in a browser and check the portal comes up over https. Then put the address on your printed forms and in your reminder templates.
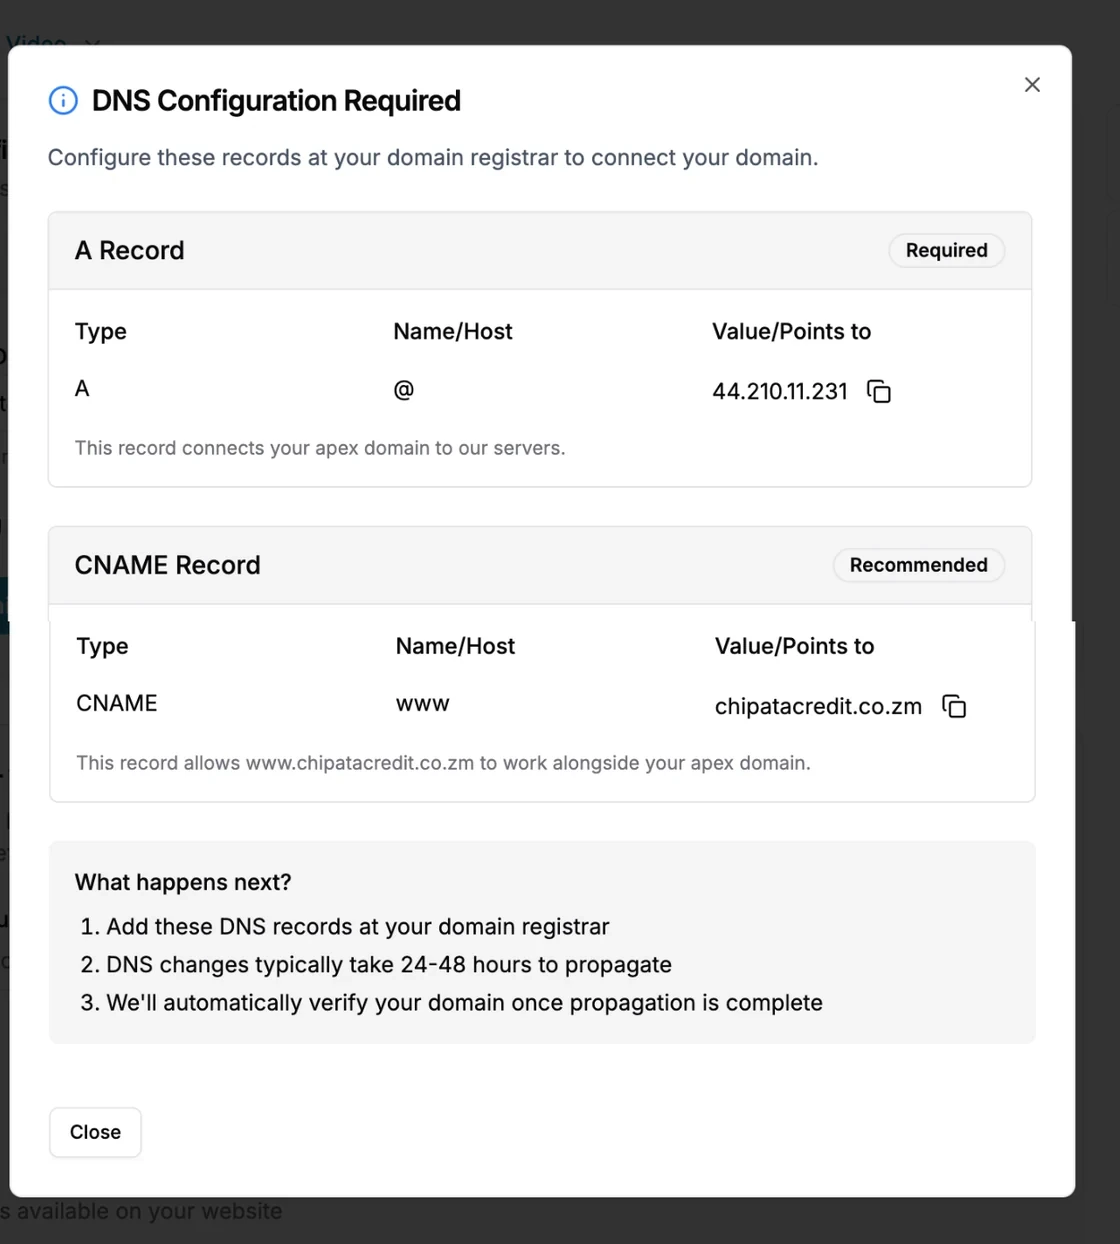
Verify Domain lists the A record and the www CNAME to add at your DNS host.
DNS changes can take a few hours to reach every network, depending on your provider.
Decide what borrowers see and fill in
Everything below is set on the Configure Website screens, by anyone on your team with the website settings permission.
Products and branches
Pick which loan products and which branches appear on the site. A product you keep for walk-in clients stays off it.
Accounts, or none
Switch on Require Borrower Account Creation to give borrowers a login and a dashboard of their loans. Leave it off and anyone can send an application without signing up.
Registration fields
Show or hide each standard field, and add custom borrower fields for anything your credit policy asks for.
Next of kin
Set the minimum and maximum number of next of kin an applicant gives, and which of their details are required.
Documents to upload
List the files an applicant must attach, such as an ID, a payslip or a bank statement, and whether each is an image, a PDF or any file.
Who can reach the site
Limit the portal to visitors from the countries you lend in, and ask applicants a short survey once they have applied.
Frequently asked questions
- No. The portal is a website that opens in the browser on the borrower’s phone or computer, and payment and signing links open the same way. The Lendbox Android and iOS apps are for your staff.
- Yes, if you leave account creation off. They choose an amount and a term, see the schedule and send the request. Switch Require Borrower Account Creation on when you want every applicant to sign in, which also gives them a dashboard of their loans.
- Yes, on the Business, Growth and Enterprise plans. You add an A record and a www CNAME at your DNS provider, and Lendbox issues the SSL certificate itself. On other plans the portal runs on a Lendbox subdomain, still under your name and logo.
- Through the channels you already use, such as bank transfer, cash at a branch or a payroll deduction. Your banking details print on their statements, and in Kenya your M-Pesa PayBill number can print there too. Your team then records each payment on the loan or in a bulk upload.
- Yes. Once a repayment is posted to the loan, whichever channel it came through, the borrower sees it on their loan, their schedule and their statement in the portal.
Do borrowers need to install an app?
Can a borrower apply without creating an account?
Can the portal run on our own domain?
How do borrowers outside Zambia pay?
Do borrowers see repayments made at the branch?
Keep reading
- All integrationsLendbox integrationsMobile money in Zambia, SMS and WhatsApp reminders, Excel import, the REST API and webhooks, each marked with how it connects.
- RelatedBorrower portal featuresWhat borrowers see inside the portal and the controls you keep.
- RelatedMobile money in ZambiaHow payment links and prompts turn into repayments on the loan.
- RelatedSMS, WhatsApp and email remindersThe messages that bring a borrower back to the portal before a due date.
- RelatedLoan origination softwareFrom application to approval to disbursement, in one workflow.
- RelatedAPI, webhooks and e-signingHow signing links work, and how your own systems read the same record.
Open your borrower portal today
Your subdomain works the moment you save it. Add your products and send your first borrower the link.
No card required